


Join The Forum To Get inspired Ideas


How to Pluck a Wig?
Everyone wants to look sleek, seamless, and stunning on every occasion with a wig. To do this Customizing your wig is the one thing that can help close that gap. That means you need to pluck your weave wig so it's specifically tailored to your hairline it's the best way to make it look as natural as possible. This process is called plucking.
Whether you prefer a curly, straight, or wavy look, you can achieve it all after plucking the hairline. This article will discuss everything you need to do for plucking your hair and achieving your desired Look.
What is Plucking?
Plucking a 16 inch wig is the process of using a tweezer to get rid of the excess hair around the hairline of a lace-front wig.
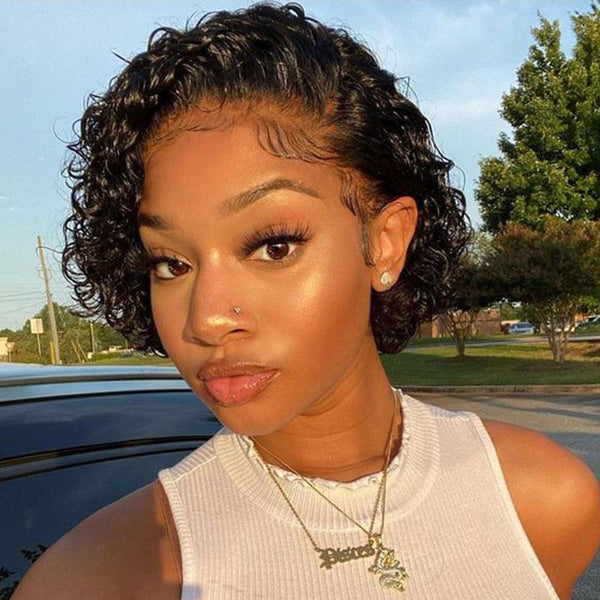
Pre-plucked wigs let you achieve a natural-looking hairline. In a plucked wig, the density on the top is lower, as is the case with real hair. Hair of unequal length always tends to grow around a person's hairline, which is a sign of natural hair growth.
Why should You Pluck Your Wig?
To get a completely realistic look, the hairpiece or the wig should also be plucked to give that same impression and create a flawless hairline. Pre-plucked human hair wigs do not have this problem.
However, for a wig that is not pre-plucked, you have to perform plucking on the wig manually. When it comes to lace-front wigs, it's all about the hairline.
How to Pluck a Wig?
Beginners may have an easier time using a wig stand because it enables you to see what you're doing. You get to move the mannequin's head backward and side to side to get a good look at how much you've plucked and how much more you need to pluck.
1 Put Your Wig on a Wig Stand
Unbox your wig and place it on your wig stand. Imagine that the wig stand is your head. The front of the wig should sit where your hairline begins on your head and the back of the wig should sit where the nape of your neck would be. To keep the wig from moving around, you'll use T-pins. Stick 8 to 10 of the T-pins into the lace right in front of the wig's hairline. You can also place a few of them along the back of the wig to further secure it.
2 Prepare Your Wig for Plucking
Begin by gently combing through the wig with a wide-toothed comb. Start at the ends of the hair and move upward toward the roots. Doing so will reduce the chances of damage throughout the detangling process.
Apply 2 palm-full of mousse across the wig's hairline and then use your rat-tailed comb or a wig brush to smooth the hair straight back. It should look sleek and be contoured to the top of the mannequin's head. This step will enable you to easily see the hairline of the wig.
Gather the hair towards the back as if you're going to put the hair into a ponytail. Then loosely secure the wig in the back using your large butterfly clip.
Now your wig is ready for the plucking process.
3 Take Some Photos of Your Hairline
After prepping your wig, pull out your phone and take some pictures of your natural hairline. You'll use these photos as a reference during the plucking process. The most natural wig hairline for you will mimic your natural hairline.
Make sure to take some pictures both straight-on and from each side. Take the photos outside on a sunny day or in a well-lit room for the best results.
Study the images you just took and note where the hairline recedes. Those are the places where you'll do the most plucking.
4 Start to Pluck the Hairline
Use your rat tail comb to carve out the shape of your natural hairline on the wig. You can use either side of the comb that you want. Take your time and part small sections at a time. Take a look at your natural hairline photos now and again as you do this part to ensure precision.
You should begin to pluck at the hairline, from either ear side, then work up to the middle. Pluck the hair wig carefully, do not focus on certain places since it may cause bald spots, and make sure not to tweeze the lace.
You can tweeze the 14 inch curly wig in any direction you'd like, but be gentle.
Pluck away all of the hairs in the sections that are hanging down. You're not done plucking until there are no hairs left in the section.
5 Separate The Hair Wig
Separate the real hair wig into sections and begin to pluck some hair off the sections, which are thicker than other parts. It will create a gradation effect with the hairline making the frontals look more natural.
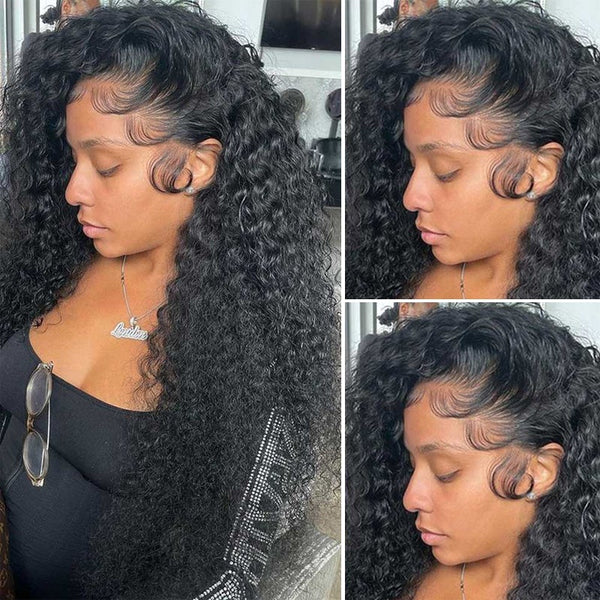
6 Recreate Some Baby Hair
After finishing the creation of the natural hairline, recreate some baby hair. This will make the hairline look natural and you'll be confident when wearing a wig.
Wigs with Pre-Plucked Natural Looking Hairline:
Plucking and customizing can be a hassle for someone very busy in life. So, pre-plucked lace wigs are also available in the market that mimics the natural-looking hairline. Users have the choice to opt for these kinds of wigs anytime.
The pre-plucked body wave lace front wig has natural roots and the baby's hair has been plucked. If the baby hair of the wig hasn't been plucked, then the exact color of the wig can replace and imitate your hair perfectly – from the hair itself, the roots, the texture, the color, and the hairstyle. When plucking the wig, the density on the top is much lower, this is entirely true with real hair, if you look at the hair strands, you will see unequal length hairs and some short hairs around the hairline. New hairs grow continuously and they cannot be the same length.
We hope this article has helped you in understanding the plucking of human wigs and customizing them to achieve your desired perfect look.


